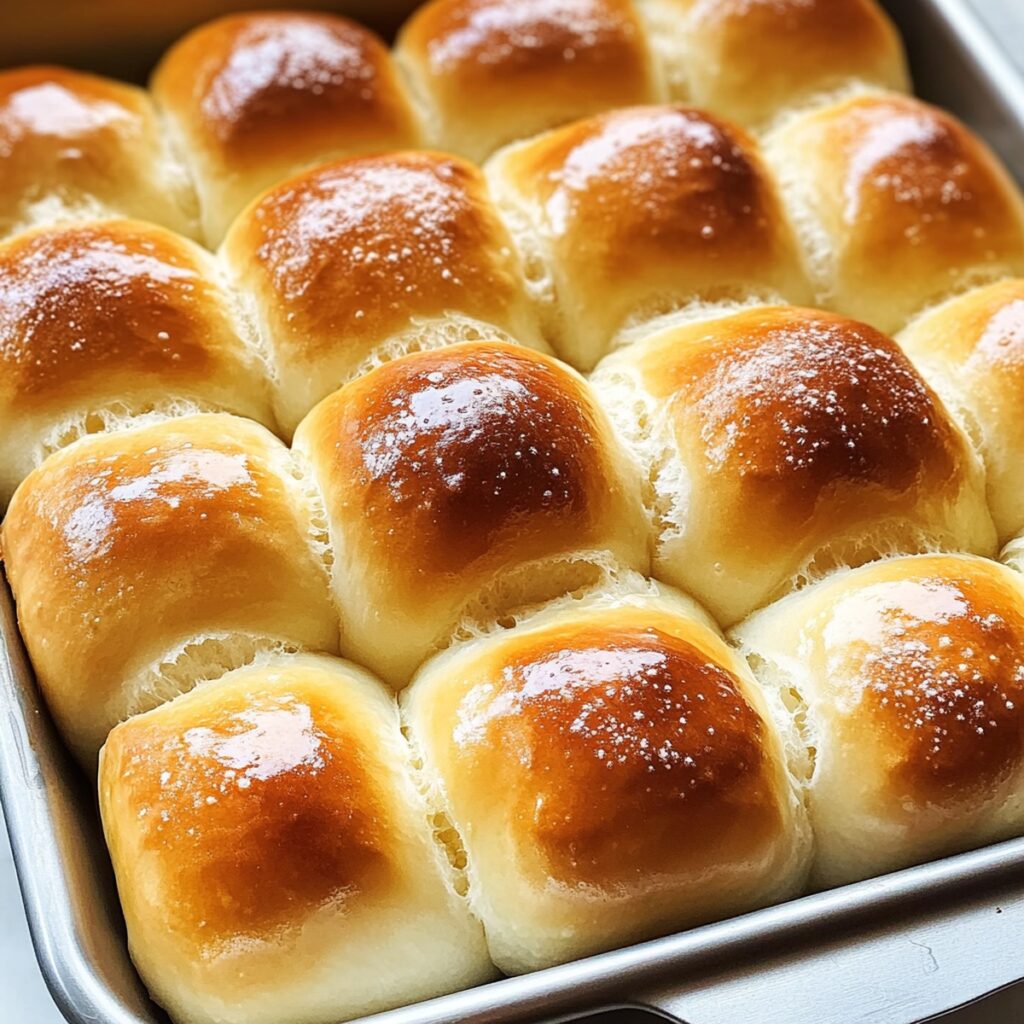
If you’ve ever wondered if homemade soft dinner rolls are worth the effort, I can say with confidence: absolutely. There’s something deeply satisfying about transforming a few wholesome basics—flour, milk, yeast, and butter—into a tray of golden, pillowy rolls. I first started making these when I wanted a healthier, fresher alternative to store-bought bread, and now I rarely go back. The process is straightforward, but the results feel special every time.
What I love about this recipe is how it fits into real life. You don’t need fancy equipment—just a bowl, a spoon, and a bit of patience. The dough comes together quickly, and kneading it by hand is actually pretty relaxing. As the rolls bake, the kitchen fills with a warm, buttery aroma that signals something good is on the way. The texture is unbeatable: soft, slightly springy, and just the right amount of richness without being heavy.
These rolls are incredibly versatile. They’re perfect for soaking up soups and stews, but they also make a great base for sandwiches or sliders. I like to brush them with a little honey butter when they come out of the oven for a touch of sweetness, but they’re just as good plain. Plus, making them yourself means you control the ingredients—no preservatives, no unnecessary additives, just clean, simple goodness. If you’re looking for a way to bring a little more freshness and pride to your table, these soft dinner rolls are a great place to start.
Nourish Yourself with Soft Dinner Rolls
Click here to get printable version
Inside This Recipe
- 1 cup (240ml) whole milk, warmed to about 110°F (43°C)
- 2 1/4 teaspoons instant yeast (1 packet)
- 2 tablespoons granulated sugar, divided
- 1 large egg
- 1/4 cup (4 tablespoons; 56g) unsalted butter, softened and cut into pieces
- 1 teaspoon salt
- 3 cups (390g) all-purpose or bread flour, spooned and leveled
- Optional Topping: 2 tablespoons melted unsalted butter mixed with 1 tablespoon honey
How to Make It Happen
- In a large bowl, whisk together the warmed milk, instant yeast, and 1 tablespoon of sugar. Cover and let it sit for about 5 minutes so the yeast can activate. You’ll know it’s ready when it looks a bit foamy on top.
- Add the remaining 1 tablespoon sugar, egg, softened butter, salt, and 1 cup of flour to the bowl. Mix with a dough hook, paddle attachment, or sturdy spoon for about 30 seconds. Scrape down the sides, then add the rest of the flour. Mix on medium speed (or by hand) until a dough forms and pulls away from the sides—about 2 minutes. If it’s too sticky, add extra flour a tablespoon at a time until it’s soft but manageable.
- Knead the dough for 5 minutes in the mixer or by hand on a lightly floured surface. The dough should feel soft and a little tacky. If you poke it and it springs back slowly, it’s ready for the first rise.
- Lightly oil a large bowl and place the dough inside, turning it so it’s coated. Cover with plastic wrap or a clean towel and let it rise in a warm spot until doubled in size—usually 1 to 2 hours.
- Grease a 9×13-inch pan (or two 9-inch pans, or a lined baking sheet). Punch down the dough to release air, then divide it into 14 to 16 equal pieces. Shape each piece into a smooth ball and arrange them close together in your pan.
- Cover the pan with foil or a towel and let the rolls rise again until puffy, about 1 hour. Preheat your oven to 350°F (177°C) and position the rack lower to prevent over-browning.
- Bake for 20 to 25 minutes, rotating the pan halfway through for even color. If the tops brown too quickly, loosely tent with foil. When done, brush with the honey butter topping if you like, and let them cool for a few minutes before serving.
Minimalist Ingredient Substitutions
If you want to lighten up these soft dinner rolls or adapt them to what you have, there are easy swaps. For the milk, try unsweetened almond or oat milk for a dairy-free version. For the butter, olive oil works well and adds a subtle flavor. You can use white whole wheat flour for up to half the flour to boost fiber without making the rolls dense. If you’re out of eggs, substitute with 3 tablespoons of plain yogurt or unsweetened applesauce—this keeps the rolls soft and moist. For a vegan version, use a flax egg (1 tablespoon ground flaxseed mixed with 2.5 tablespoons water) and plant-based butter or oil.
Plating Ideas for Elegant Simplicity
Presentation can make these soft dinner rolls feel special even on a weeknight. Serve them in a cloth-lined basket to keep them warm and soft. For a minimalist look, arrange the rolls in a single layer on a wooden board with a small bowl of whipped butter or olive oil for dipping. If you want to add a pop of color, sprinkle a little fresh chopped parsley or flaky sea salt on top after brushing with honey butter. For gatherings, stack the rolls in a pyramid on a platter for a centerpiece that’s easy to grab and share.
How to Store with Zero Waste in Mind
To keep these rolls fresh and minimize waste, store them in an airtight container or reusable beeswax wrap at room temperature for up to 3 days. For longer storage, freeze the rolls in a single layer, then transfer to a reusable freezer bag—this prevents sticking and freezer burn. Thaw at room temperature or warm in a low oven. If you have leftover rolls that are a bit stale, cube and toast them for homemade croutons or use them in bread pudding, so nothing goes to waste.
Cooking Tips to Let Core Flavors Shine
For the best flavor, use high-quality butter and fresh yeast. Don’t rush the rising times—letting the dough double ensures light, fluffy rolls. When kneading, aim for a dough that’s soft and slightly tacky, but not sticky. Be gentle when shaping the rolls to keep the texture airy. If you’re brushing with honey butter, do it right after baking while the rolls are still hot so the topping soaks in. This simple step adds a lot of flavor without extra effort.
Minimalist Seasonal Twists
To keep things fresh and seasonal, try mixing in a tablespoon of chopped fresh herbs like rosemary or chives in spring, or a pinch of ground cinnamon in fall. In summer, add a bit of lemon zest to the dough for brightness. For winter, sprinkle the tops with a little coarse salt and cracked black pepper before baking. These small tweaks let you enjoy the same basic recipe year-round, adapting to what’s in season or what you’re craving.
Recipe FAQ: Common Questions
Can I make the dough ahead and bake later?
Yes, you can prepare the dough and let it rise in the refrigerator overnight for the first rise. The next day, let it come to room temperature, shape the rolls, and allow them to rise again before baking. This slow fermentation can actually improve the flavor and texture of the soft dinner rolls.
Why did my rolls turn out dense instead of fluffy?
If your rolls are dense, it’s often due to under-kneading, using old yeast, or not allowing enough time for the dough to rise. The dough should double in size during each rise—if it doesn’t, give it more time in a warm spot. Also, be careful not to add too much flour; the dough should remain soft and slightly tacky.
How do I know when the dough has risen enough?
The dough is ready after rising when it has doubled in size and springs back slowly when gently pressed with a fingertip. If it bounces back quickly, it needs more time. Don’t rush this step, as proper rising is key for soft, airy rolls.
Can I use active dry yeast instead of instant yeast?
Yes, you can substitute active dry yeast for instant yeast. Just be sure to dissolve it in the warmed milk with the sugar and let it sit until foamy, which may take a few extra minutes. The rest of the process remains the same, but rising times may be slightly longer.
What’s the best way to reheat leftover rolls?
For the softest results, wrap leftover rolls in foil and warm them in a 300°F (150°C) oven for about 10 minutes. This helps retain moisture and restores their pillowy texture. Avoid microwaving, as it can make the rolls tough or rubbery. If reheating from frozen, let them thaw first for best results.
Can I make these rolls gluten-free?
While this recipe is designed for wheat flour, you can try using a 1:1 gluten-free flour blend that includes xanthan gum. The texture may be slightly different, and you might need to add a bit more moisture. Be sure to check the dough’s consistency and adjust as needed for a soft, tacky feel before shaping and baking.

Soft Dinner Rolls
Equipment
- Stand mixer or large bowl
- 9×13-inch pan or two 9-inch pans
Ingredients
For the Dough
- 1 cup whole milk warmed to about 110°F (43°C)
- 2 1/4 teaspoons instant yeast (1 packet)
- 2 tablespoons granulated sugar divided
- 1 large egg
- 1/4 cup unsalted butter softened and cut into pieces
- 1 teaspoon salt
- 3 cups all-purpose or bread flour spooned and leveled
Optional Topping
- 2 tablespoons melted unsalted butter mixed with 1 tablespoon honey
Instructions
- In a mixing bowl, combine the warmed milk with yeast and 1 tablespoon of sugar. Give it a good whisk, then cover and let it sit for 5 minutes to let the yeast activate. A large bowl and a sturdy spoon can also work if you lack a stand mixer.
- Next, add the remaining sugar, egg, softened butter, salt, and 1 cup of flour to the yeast mixture. Using the dough hook or paddle attachment, mix on low for about half a minute. Scrape down the bowl and add in the remaining flour, mixing on medium until the dough separates from the bowl—which should take about 2 minutes. If the dough becomes too sticky, incorporate flour gradually—1 tablespoon at a time—until you achieve a soft, manageable consistency.
- Continue kneading in the mixer for another 5 minutes or, if you prefer, knead the dough on a lightly floured surface by hand for 5 minutes. If it feels sticky, dust it lightly with more flour, but take care not to overdo it. The dough should remain soft and tacky. Gently poke it; if it springs back gradually, you’re good to go!
- Lightly coat a large bowl with oil and set the dough inside, making sure to turn it to cover with oil. Cover the bowl with plastic wrap or a clean towel, then allow it to rise in a warm location until it has doubled in bulk; this should take about 1 to 2 hours.
- Prepare a greased 9×13-inch pan or two 9-inch pans, or a cast iron skillet. Once the dough has risen, punch it down gently to expel air, then divide the dough into 14 to 16 equal portions. Shape each piece into a smooth ball and cluster them closely in the pan.
- Cover the shaped rolls with foil or a towel and let them rise again until they are puffy; this will take about 1 hour. In the meantime, preheat your oven to 350°F (177°C), placing the rack in a lower position to prevent over-browning of the tops.
- Bake the rolls for 20 to 25 minutes or until they achieve a nice golden color. Make sure to rotate the pan halfway through baking. If the tops begin to brown too rapidly, cover them loosely with foil. Once finished, brush the rolls with the honey butter mixture if you choose, and allow them to cool for a few minutes before serving.